| Features: Ponds |  |
Making a habitat basket
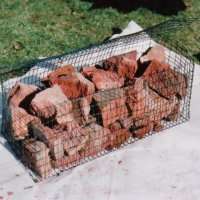
What I've termed  a 'habitat basket' is a collection of rubble, stone, wood etc, bundled together, by means of wire mesh a 'habitat basket' is a collection of rubble, stone, wood etc, bundled together, by means of wire mesh a 'habitat basket' is a collection of rubble, stone, wood etc, bundled together, by means of wire mesh. The gaps in between these elements form ideal nooks and crannies where a host of invertebrates and other animals can meet some of their habitat requirements. The idea can operate at different scales; from small ones (such as those described here), to those up to around a cubic meter in size (and perhaps a ton in weight). a 'habitat basket' is a collection of rubble, stone, wood etc, bundled together, by means of wire mesh. The gaps in between these elements form ideal nooks and crannies where a host of invertebrates and other animals can meet some of their habitat requirements. The idea can operate at different scales; from small ones (such as those described here), to those up to around a cubic meter in size (and perhaps a ton in weight).
I first came a across this idea when the RSPB used them at the Chelsea flower show 2002 in a garden called the'RSPB/Severn Trent Water - Bird Garden'. The large baskets they used, known as wire gabions, were half submerged in water and large enough to be stood upon. The idea is taken from the construction industry where they are used to make retaining walls.
Materials
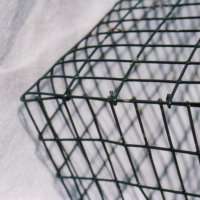
Most of the materials for this project could hardly be easier to come by. Only the wire mesh is something which you might need to go beyond your garden or garage to find. The dimensions of the mesh will depend upon the size of basket you wish to create and the sort of animals you want to provide access forThe dimensions of the mesh will depend upon the size of basket you wish to create and the sort of animals you want to provide access for. Since my baskets were intended to be used in the pond, chiefly by invertebrates, I used a relatively fine mesh of 13 by 23mm. I obtained this mesh from a garden centre some years ago and, for several years, it covered my old garden pond. It was strong enough to take the weight of a child and, over the time it covered the pond, it did not deteriorate at all, giving me confidence that it will not quickly deteriorate in the pond.
The material you use to fill the mesh basket should suit the size of the mesh and basket you create. Don't use rubble that's so fine, it compacts too much to provided sufficient cavities for wildlife to use; and don't use stuff that's so large that the cavities created between the pieces are too big to provide secure sanctuaries for your 'target' animals. You can use broken bricks, stones, virtually any sort of rubble and even wood (e.g. old logs)You can use broken bricks, stones, virtually any sort of rubble and even wood (e.g. old logs); just bear in mind that you don't want to use anything that will weather and break down too quickly.
Construction
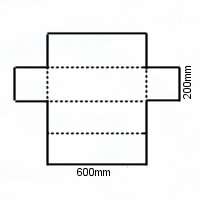
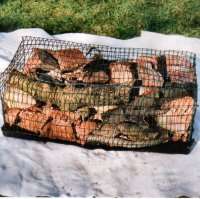
I decided to make two baskets of dimensions roughly 200 by 200 by 600mm. Together these were to form a retaining wall in my new pond, behind which I was going to deposit soil from the old pond. I marked out each basket as a single piece of wire mesh and cut it using wire snips. Where two edges were to be joined, I left small pieces of wire protruding from one of the edges and these were twisted around the adjoining edge to secure the whole basket.
Before securing the 'lid' I filled each basket with rubble; mainly consisting of broken and some natural stone (a variety of material is likely to make the basket suitable for more species of animals). In one of the baskets I even put some small natural logs, which as they rot down, will provide another kind of habitat. In the top of this basket I also nestled a small pot containing a plant of curled pondweed (Potomageton crispus).
Because these baskets were to be placed in my pond, I took some scraps of polyfibrelay pond liner underlay and, with needle and thread, tacked them to the base of the baskets so that they would not come into direct contact with the liner. During the construction, I also took extra care to ensure that there were no protruding pieces of wire which could puncture the liner.
Positioning the baskets
Generally speaking, these habitat baskets don't make attractive garden features. Unlike a bird nesting box, which you might build first and then look for a place to put it, you should have a good idea of where you are going to put your basket before you make ityou should have a good idea of where you are going to put your basket before you make it: the design and construction will depend, in part, on this consideration. Unless you have a garden which is suited to using this kind of construction as a feature (as with the RSPB show garden at Chelsea in 2002), these baskets are best hidden from the eyes of people: they are important for the function they serve as animal habitats.
The small baskets described here were constructed for use as a retaining wall in my garden pond, but you can use them anywhere you have an inconspicuous spotyou can use them anywhere you have an inconspicuous spot, in or out of water, that invertebrates could be encouraged to make use of.
You might consider placing some small ones under shrubs, behind a wall or somewhere where they can be covered with leaf litter: the possibilities are endless
You could, of course, just make a pile of rocks and rubble, but these piles have a tendency to erode and spread: containing it within a basket makes it more manageable, stable and attractive. In a recent episode of the BBC's Groundforce, some of these habitat baskets (as well as log piles and other invertebrate habitats) were used under a high deck where they could benefit wildlife, but remain out of sight. You might consider placing some small ones under shrubs, behind a wall or somewhere where they can be covered with leaf litter: the possibilities are endless.
| First published May 2003. | |
Copyright Richard Burkmar 2003. Permission is hereby granted for anyone to use this article for non-commercial purposes which are of benefit to the natural environment as long the original author is credited. School pupils, students, teachers and educators are invited to use the article freely. Use for commercial purposes is prohibited unless permission is obtained from the copyright holder. |
Back to home page
Do you live in Merseyside? Interested in its wildlife? | |